


Your cart is empty.
3D Spider Picture


3D Spider Picture

Here is an easy Halloween craft to create a 3D spider picture! So grab the frames, cardboard straws, and half foam balls, and let's get started!
An easy and original craft that children will be proud to hang in the house for Halloween decoration!
Thèmes de l'idéa créa :
#Animal Tutorials
#Craft Tutorials
#Funny Characters Tutorials
#Halloween Tutorials
How to make this craft step-by-step:
Materials:

To make a spider you will need:
- a half ball of polystyrene Ø 9.5 cm
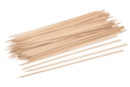
- cardboard straws
- a 3D bow tie sticker
- two wiggle eyes Ø 2.5 cm
- a trick frame
- a sheet of thick colored paper
- black acrylic paint
- a synthetic bristle brush
- white glue
- a black marker
- a pair of scissors
- a wooden skewer
Step 1:

To start, paint the half Styrofoam ball with black acrylic paint.
Then let it dry for 30 minutes.
Tip : insert a skewer underneath the half ball to paint the entire surface at once and avoid getting your fingers messy!
Step 2:

Place a sheet of paper in the color of your choice horizontally.
Then draw a line starting from the top of the sheet down to its center with a black marker.
Step 3:

Using white glue, glue the half-sphere to the center of the board.
Step 4 :

Glue an optical illusion frame around the sheet of paper with white glue.
Step 5:

Cut:
- 8 pieces of straw measuring 6 cm
- 8 pieces of straw measuring 2.5 cm
Step 6:

Glue the straws with white glue on the board to form the spider's legs.
Step 7:

Glue two moving eyes Ø 2.5 cm.
Tip: Hold the eyes with your fingers while the glue dries so that the eyes do not slip.
Step 8:

Finally, stick a 3D bowtie sticker onto the half-sphere.
Materials Needed:
Materials Needed:

3,49€ (either 0,58 € / pc)
Available


8,49€ (either 0,34 € / pc)
Available


2,99€ (either 1,00 € / pc)
Available


Other tutorials on the theme "Halloween Tutorials"








 4/5


Vos créations inspirées par ce tuto
Customer review
Give your feedback
3D Spider Picture
Be the first to share your review of this product.
Post a review